The Plastic SCM blog

Branching and merging strategies

A few days ago I’ve found a very interesting post describing in detail a very strong branching and merging strategy: http://nvie.com/git-model.

While the original post is about Git, it exactly describes the technique we’ve being describing and enforcing since we released Plastic SCM 1.0 back in 2006.

As the post states, there’re huge benefits if you use branching and merging correctly, and of course you need to have the right tools to do that (and as the author says, CVS and SVN were discouraging the whole branching/merging strategy since they were totally unable to do so).

If you’re familiar with Plastic and you take a look at the Git’s post, you’ll find the diagrams are drawn differently. But just take a look at the following figure:


What we do with the Plastic branch diagram is render the branches from left to right instead of top-down, which is much better to use the available space on any modern screen, especially panoramic ones.
So, the hand-drawn graphic shown above becomes something like the following if you use Plastic SCM:


I’ve used the conditional formatter to render branches with the same colors in the Git diagram above.

As you know, besides of being able to provide best of breed branching and merging, Plastic is also all about visualizing the change flow: from the branch diagram above to rapidly inspecting changes visually, displaying version trees or simply replicating branches back and forth.
That being said I’d like to add some remarks/comments based on best practices.

Identifying the branch per task pattern


The pattern used for new features (the task or feature branches the original post talks about) is known as branch per task

The model pushes branching to the limit and then instead of using branches just for new releases or hot fixes, it enforces branching off for every new task.

You can learn more about branching patterns here:
  • http://www.cmcrossroads.com/bradapp/acme/branching
  • And reading the most complete book about branching ever published: http://www.scmpatterns.com

    Best practice: when to create task branches


    Simple rule: create a task branch for every new feature or bugfix you’ve to implement.

    It basically means: forget about mainline development even when it’s hidden on a secondary branch (it’s clear you don’t checkin to the main branch anymore): don’t checkin directly to the develop branch nor the release branch, always use branches to isolate your changes.

    It can sound like overkill for SVN/CVS users but you know any modern SCM will let you create branches in a second, so there’s no real overhead.

    Important note: if you look at it carefully you’ll see that I’m talking about using task branches as rich-man changelists. Systems like Perforce (and new versions of SVN) implement the concept of changelist as a set of logically related changests. That’s exactly what a task branch is but: in a changelist you can’t have more than one revision of the same file or directory while you CAN do that with a task branch.

    Best practice: task branch naming convention – issue tracking


    I’ve seen a lot of projects out there using issue tracking for bugs, but then relying on hard-to-track mechanisms for new functionalities.

    Issue tracking rule of thumb: use your issue tracking for everything: every change on your code will have an associated issue, no matter whether it’s a bug, a new functionality, a performance issue, a refactor... always create an issue on your favorite issue tracking / project management system. It will easily create the traceability you’ve been always looking for.

    SCM rule of thumb: create a branch for each issue you’ve to code and use a naming convention to associate the branch with the issue on the issue tracking system. This way the branch to fix bug 1074 will be bug1074, or the branch to implement new feature 1075 will be something like feature1075.

    Note: while giving different prefixes sounds good, what we normally do with Plastic SCM is just give it a simple prefix and we don’t differentiate the task branch type with it. Plastic has a number of integrations with systems like Jira, Bugzilla, OnTime, VersionOne, Rally and so on that let us display task/bug information within the GUI.

    Best practice: task branch starting point


    How do you create your task branches? It’s clear you’ll have to branch off from the development branch but, at any given point?

    This is how one of the branches I’ve created for the sample above looks like when you check its properties within Plastic SCM:


    The fix103 branch starts from branch develop at changeset 4. Is it correct? Well, it’s perfectly doable but I’d encourage the following best practice instead:
  • Create frequent intermediate releases on the develop branch. They can be daily builds (or nightly builds if you prefer) that passes the entire test suite.
  • Once you’ve a stable release (passing all tests, not just a on-commit quick subset but all of them, like you’d do for a external release) label it accordingly.
  • Only create task branches starting from well-known intermediate stable releases (or stable builds if you prefer)

    Look at the following figure: although I mentioned before that develop branch should only be used as integration, it’s possible that we still do some intermediate checkins there (especially if we don’t enforce the best practice or if we do some fixes while running the test suite). We shouldn’t use any of this intermediate checkins as starting points but stable builds.


    The benefit is clear: if any test doesn’t work on your task branch is because you’ve broken it, since you always start from stable origins.

    Side note: fast forward merges and Plastic SCM


    Plastic SCM always creates a changeset on merge even when a fast forward could be applied, to preserve the right (and visual) merge history. The author claims it can’t be done by default with Git, but we found it to be a very strong best practice so it’s the behavior Plastic SCM always does.

    Best practice: branch namespace


    You’ve noticed that Plastic SCM branches on the diagram above look like /main/develop or /main/develop/fix103 and so on.
    In Plastic you normally create branches with an operation called “create child branch” which means your branch is going to be the child of a parent one. This is not only useful to set the right origin but also to understand, at first sight, how the branches are meant to be used.
    For instance, you can have the following kinds of fix branches:
  • /main/develop/fix103
  • /main/release01/fix105
    See what I mean? Fix105 is obviously a fix done on a release branch instead of a develop one.
  • Reviewboard integration

    We've integrated Plastic SCM with reviewboard, find a demo screencast below.

    DVCS buzz

    Have you ever heard about DVCS?? I bet if you're a developer and you've being somehow living on planet earth at least once on the last twelve months you must have heard about Distributed Version Control Systems. Haven't you?

    Even the great Joel Spolsky dedicated his last ever post to DVCS.

    What's all this buzz about?

    Look, some cool guys on the software industry made their talk on what they feel version control:

  • Linus Torvalds himself advertised Git and DVCS to the limit (check it here).
  • Mark Shuttleworth (the former CEO at Ubuntu, just in case you're an alien ;-P ), talked about branching and merging (check my post here) and has a clear interest on Bazaar.
  • And I already mentioned Joel "the blogger" talking about DVCS.

    So, it seems a nice trend has been created but... what is it all about?

    Look a little bit careful at Spolky's link: what is he talking about? Being distributed is really powerful but at the end what they're all talking about is about branching and merging. Yes, as simple as it sounds, all the buzz on the hundreds of tutorials out there are focusing more on good-ol branching patterns than on distributed itself.

    Why?

    Because this new wave of DVCS evangelists (ok, it's cooler to put DVCS than branch on a headline) is singing a totally different song than the previous generation, exactly the opposite lyrics: instead of avoid branching at any cost they're now singing "let's embrace branching as a daily common practice".

    Why?

    Because you can.

    Yes, as simple as that: the previous generation of SCMs were unable to handle hundreds and hundreds of branches and merges: it would be a suicide with CVS and VSS, it would be painful as hell with Subversion and other commercial systems wouldn't do better.

    But now there's a brand new generation ranging from Git, Bazaar and Mercurial on the free side to Plastic SCM on the commercial one, which are not only distributed but let you branch and merge as you never seen before.

    (Side note: here's our branch explorer showing the whole "forest" of branches and branches and branches)


    It sounds to me really like the agile methods wave a few years ago: don't avoid change, simply embrace it. So, let's do the same here: don't avoid branching, simply embrace it... with the right tools!
  • Distributed development for Windows programmers

    Each time someone starts writing on distributed development there are some arcane and obscure commands that immediately show up to specify how the changes have to be popped from or pushed to some freely available internet repository. And that's fine, but most of the developers out there are more used to right menus, dialogs and options than typing on black consoles. So at the end it looks like distributed development is something for open source developers working on Linux, and that's obviously not true.

    Let's try to describe the whole picture and how you, as a Windows developer most likely working on a commercial project for your company, can also benefit for the new trend of going distributed.


    Your current scenario

    So, you're using Visual Studio on a daily basis and committing changes to your version control, getting updates from the rest of the team and potentially creating tons of small feature branches to better isolate your code changes (if you didn't embrace yet branching then I bet it will be a great first step before going distributed, but keep reading to check how it will also benefit you).

    You probably have several workspaces to work on different projects or just to focus on different tasks without having to update the whole thing again and again (which should be also fast, but you know…).

    So basically you go to one of your working copies, make changes from there, and submit there to your central server at the office which lets you forget about how or where the data is stored and it is powerful enough to run very fast and make your life easy :-P.

    What this distributed thing is all about?

    It's much simpler than you think. Let's start with a nice scenario: suppose you've decided to work at home for a week, avoiding the daily traffic jam and having some spare time at noon to do a break and practice some sports close to your place, sounds good? (Later I'll describe another not so beautiful scenario).

    The situation will be something like the following picture, where you've access to your version control server only through a VPN or network connection.

    The main issues you'll face will be:


  • Connection can be lost, slowing you down, having to reconnect and simply making you lose time.

  • Connection can be slow: switching to a different branch or simply committing or retrieving changes will be painfully slow.

  • What's the solution? Going distributed. Imagine you've your own version control server on your laptop, so you don't have to connect to the office's central server anymore, everything will be extremely fast, no waits, no connections being lost! Of course, since your laptop won't be as powerful as the central server, you don't need a full copy of all the repositories but only certain parts of the ones you'll need to work with, so you can keep making changes and then synchronize them back with the central server when you're back at the office or through the network when you decide to send them back.

    The advantages are clear:


  • You can move your laptop from work to home (or whatever different locations you can think of) and you'll always be able to continue working seamlessly.
  • You won't have to wait for changes to be downloaded to your machine from distant locations through slow and unreliable networks.
  • You're free to continue making changes having full version control support (hey! You can try a poor's man approach just copying a workspace to your laptop, but then you won't be able to access file history, switch branches, make intermediate commits and all this things you get used to when you have version control).
  • Alternative scenarios

    As a professional developer there are many scenarios where you can benefit from distributed development. The one described above, working at home, is just one of them but there are many other chances like:


  • Working on the customer's site for some days (or even much longer) and still being able to do controlled changes to the source code.

  • Attend a demo, event and so on and still be able to try a nice change on the code but doing so in a controlled way.

  • The multi-site scenario: connecting several teams by using distributed development between their servers.

  • Hands on lab: what to do next


    Once the theory is clear, let's just make it happen. Here're the steps we're going to follow:


  • Set up a server on your laptop.

  • Import the repositories you need from the central server.

  • Start working on your distributed server at your laptop.

  • Submit your changes back to the central server.

  • Get changes from the central server.

  • Set up your own "server"

    Depending on the version control system you're using it will require different steps. Let me clarify:


  • If you're using an open source system like Git you won't have a server as such, it will just be a local copy on a directory (typically your workspace) so set up is fast and easy. You can download the Windows installer from here: http://code.google.com/p/msysgit.

  • If you plan to use Mercurial you can find the download here: http://mercurial.selenic.com/downloads. Mercurial includes a small HTTP server that allows you to synchronize with other servers and other people to take changes from you.

  • If you plan to use Plastic SCM you can set up the client and server on your machine in less than 45 seconds as you can see in this video: http://www.youtube.com/watch?v=CVlsVtxZUkk. Plastic is meant to be used from a graphical user interface from day one, so it will be pretty straightforward to use (you know I'm obviously biased here, but just check it and judge it yourself).

  • Unfortunately for Windows developers out there, Team Foundation Server is out of the picture since it simply does not support the distributed workflow. Although it can be installed in less than 45 minutes :-P.

  • Your server (whether is a real one or just a directory with a copy like in Git) will hold your replicated data and will let you work with your code while you're disconnected.

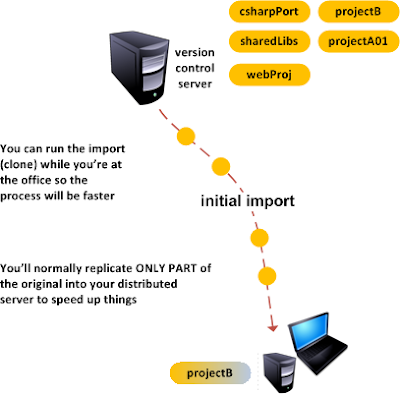
    Replicate from the central server

    Once you've your server set up you need to perform an initial code import from the central server. To make things simpler suppose you're only going to work on a single project while disconnected from the central location. Then you'd have to replicate (or clone depending on your specific SCM jargon) one single repository into your laptop.

    Normally you won't replicate the entire repository but only part of it. What does it mean? Your central repo will contain hundreds if not thousands of feature branches, releases and so on, but it will be enough for you to work distributed if you get the main or master branch into your cloned repo.

    You can have a very big central repo with many branches like the one on the previous picture but you only need the main one to start working.

    So the clone process will just mean replicating the remote main branch into a new local repository on your laptop.


    You can do that with Git using the git clone command, or you can do that with Plastic even within Visual Studio as you can see on the following picture.

    You can see how I've specified centralserver as the replication source and then a new repository I've just created on my laptop as destination. I click on replicate and the import process starts, as you can see on the following screenshot. (Remember I'm driving the whole process from within Visual Studio 2010).

    The initial clone can take a little longer depending on the size of your repos (and the speed of your connection, so it's better if you do it while you're on the same network!), but the good thing is after that all the following operations will be extremely fast.

    And once you're done replicating you can browse the changes on your new repository, which will contain all the commits (or changesets depending on your SCM) and labels (tags) coming from the central server.

    The version control will keep track of which is the source of each element being replicated. For instance, in the previous screenshot you can see how the selected commit is coming from the remote repository you've just replicated (check the properties tag).

    Start working on your laptop disconnected from the central server

    You've already completed your initial clone, so it's time to start working on your code without having to be slowed down but your central server.

    The pattern I'm going to recommend is using feature branches (or the good-ol branch per task branching pattern as you can find here: http://www.cmcrossroads.com/bradapp/acme/branching).

    What does it mean? Well, for every bugfix or new feature you're going to implement you'll create a brand new branch, make your changes there and get them integrated into your main branch (or master or trunk depending on your jargon) later.

    It's much, much easier than what you might think. Just google for
    feature branches if you need more information on the subject, but it's really simple as you'll see.

    Creating a new branch is an easy task on any modern version control tool. I'm showing how to do it with Plastic SCM and Visual Studio: I'm going to create a branch from a given changeset as you can see on the following screenshot. I just right click on the changeset and select create branch from this changeset. Different SCMs will do it on a different way but as soon as they're ready for branching (which is unfortunately not true for all of them), it won't be hard to do.

    With Plastic SCM you'll find a dialog like the following where you can specify some extra data about the branch to create like comments, name and so on.

    Since I'm just going to fix a bug on the new branch I give it a meaningful name. Note: it's very important to follow some sort of naming convention for feature branches since you're going to deal with a big number of them. My favorite is giving them a certain prefix and then a number, which is directly taken from the associated issue on the bug/issue tracking system.

    After the branch has been created your situation will be something like the following:

    So next step is just switch your workspace to the branch and start working on it. What does it mean? Well, tell your SCM that the changes you're going to make to fix the code have to go to the branch you've just created. It's not a big deal either!

    Now it's the time of doing some real coding, making changes on your code to fix a given bug or issue. Not hard to do using Visual Studio 2010 (ok, or extremely hard depending on the specific bug!).

    Visual Studio (from long time ago) comes with the pending checkins perspective to communicate with your version control and find what you've changed. In my example I've just modified a single file and I'm ready to commit it (and even added a meaningful comment to the change).

    If you go back to inspecting your repository after your initial commit you'll see something like the following:

    A couple of interesting things: first there's a new changeset on your branch and your changeset is not replicated (look at the replication source property on the right).

    You can do very useful things like inspect the changes you've just made which is one of the good reasons of having your own version control on your laptop!

    You can now easily repeat the process to work on different bug fixes, all starting from a well-known point, creating a branch for each of them.

    Send your changes to the central server

    You've been working for a while and you've already fixed a couple of bugs, so it's time to send your changes back to the central server. Hook up to your VPN and then push your changes.

    In order to do so: the sequence of steps will vary depending on the SCM of choice. In case you're using Plastic SCM you can do it from the branch explorer within Visual Studio, simply select the branch you want to push, right click on it and say "push".

    And you're done! Repeat the process for every branch you want to submit.

    Getting remote changes

    Getting remote changesets from the central server is also pretty straightforward. You'll have to repeat the steps you've completed when setting up your repository but this time instead of getting the entire branch it will only find what's have been modified since the last clone! Faster and easier.

    Wrapping up

    It's been a pretty fast step by step tutorial but I think I've covered the major concepts involved in replication and even some examples on how to achieve it with a specific tool, all within your beloved Visual Studio and without typing a single command!

    Setting up an Oracle backend for Plastic SCM


    As I mentioned on the Plastic SCM 2.9 announcement, now Plastic supports a new backend: Oracle.
    Plastic SCM stores all data and metadata on standard database backends, which is great for data integrity and also to allow you running custom reports by simply running standard SQL queries (something you couldn’t obviously do if we were using some cumbersome ad-hoc file based storage).
    So far we do support SQL Server (check how to configure it here), MySql (check here for the instructions on how to set it up) and Firebird (which the one included by default).
    When you install a Plastic SCM server on both Windows and Linux it will use a Firebird backend by default. On Windows it will use an embedded Firebird instance (which means there won’t be a separate database server process but it will be run by the Plastic process itself) and on Linux it will use a normal Firebird server.
    What I’m going to setup here is the following scenario: Plastic server will work with a separate Oracle server (configured on a different machine) as the following graphic shows:


    Of course we could run the Plastic server on the same machine where the Oracle server is installed, but this will give us extra CPU power since we’ll be using two servers instead of one! :-)
    Let’s check how to do it:
  • Stop the Plastic server
  • Edit/create a db.conf file on the server directory with the right Oracle connection instructions
  • Check the server can connect against the Oracle instance
  • Check the client can see the new databases

    Stop the Plastic server
    If you’re on Windows this is a trivial step: just go to services and stop Plastic SCM.
    If you’re on Linux it’s not hard either: su to root and go to the Plastic SCM server installation directory (typically /opt/PlasticSCM/server) and run:

    # cd /opt/PlasticSCM/server
    # sudo ./plasticsd stop


    Edit db.conf
    If you’re on Linux you’ll have a db.conf file at the server’s directory (/opt/PlasticSCM/server/db.conf). You’ll just have to edit it.
    In case you’re on Windows, by default, the file won’t be there, so just create a new one.
    Let’s check the contents you’ll have to put for the Oracle connection:

    Note: remember <ConnectionString> and <AdminConnectionString> must go on one complete line each, it has been splitted here for the sake of clarity.

    <DbConfig>
    <ProviderName>oracle</ProviderName>
    <ConnectionString>Direct=true;User={0};Password={0};
    Data Source=oracle.codicefactory.com;Port=1521;SID=orcl
    </ConnectionString>

    <AdminConnectionString>Direct=true;User Id=SYS;
    Password=oracle;Data Source=oracle.codicefactory.com;
    SID=orcl;Connect Mode=sysdba</AdminConnectionString>

    <DatabaseCreationCommands>
    create smallfile tablespace @PlasticDatabase datafile
    '@PlasticDatabase.dbf' size 10M reuse autoextend on next 10M;
    create user @PlasticDatabase identified by @PlasticDatabase
    default tablespace @PlasticDatabase temporary tablespace Temp account
    unlock quota unlimited on @PlasticDatabase;
    grant connect, resource, create session, create table,
    create view, create any index to @PlasticDatabase;</DatabaseCreationCommands>
    </DbConfig>


    First of all you’ve to specify the kind of backend you’re going to use: that’s the line ‘ProviderName’ and we specify oracle.
    Second you’ve two connection strings: one for the ‘regular operations’ and one for the ‘administrative ones’. What does it mean? Plastic will always connect to Oracle using the first connection string except when it has to create new repositories (for instance during the first start up with the new backend) when it will use the AdminConnectionString.

    Why we do this? Because if you’re using an Oracle backend chances are you’re setting it up on a corporate server, which means your IT department will have tight control on it, and they won’t probably like the idea of having an application running with high permissions continuously. So this way we clearly separate the way in which connections are established, which will make your IT team happy.

    Then we’ve the DatabaseCreationCommands which lets you customize the way in which databases are created.

    By default every Plastic repository will be a tablespace, and we’ll create a user associated to it. You can find the create tablespace and create user sentences there and you can modify them to better adjust to what you really want to achieve.
    For instance, the tablespace is created as an small one, but probably you want to create it as a bigfile and also adjust the initial size to something bigger than 10Mb and autoextend with a larger amount too.

    Check the server can start with the new configuration parameters
    Once you’ve edited db.conf the next step is to start up the Plastic server again and check everything is up and running.
    While you can directly use the plasticsd script to restart your daemon on Linux or go to services and start the service again (and it will work if you set up everything correctly) I’m going to show you a small trick which is very useful for diagnostics: just run

    plasticd --console


    And the server will start in console mode. Wait until you read a message telling the server is up and running on check the errors if any.
    In case you need detailed information, check the loader.log.txt file which will contain the errors.

    Note: something very useful for diagnostics is modifying your logger configuration (loader.log.conf) to make plasticd output the log on the console, and then rapidly check if something is wrong. Remember to set it back to file logging once you’re done!

    Once you’ve checked you can start up the service/daemon, you can run it with the regular services or ./plasticsd method.

    Check you can connect to the new database

    If you run a cm lrep command against your server now you should see your new empty databases being created. You must be able to create new repositories too.

    Some important notes for database administrators
    Plastic SCM does not create a new Oracle database to store the repositories data; instead of that, it creates a new tablespace inside the existing database instance. The reason for doing that is that an Oracle's database is a very heavyweight object, which implies new processes and a lot of resources consumption.

    One of the most important consequences of that is the encoding that Plastic SCM will use. In Oracle, the encoding is established in the CREATE DATABASE sentence, and after that it is very tricky to change it. The simplest case is that the new encoding that you want to set is a strict superset of the old encoding. In this case an ALTER DATABASE CHARACTER SET statement should work fine.

    Thus, Plastic SCM will use the encoding defined by the database instance in which the tablespaces are created. Take this into account in case you want to use Arabic, Asian or other "non-standard" symbols in your version control system.

    In order to know which encoding is configured in your database, mount the target database instance and execute the following query in sqlplus:
    select value from nls_database_parameters
    where parameter='NLS_CHARACTERSET';

    We recommend to set the encoding to utf8 for a better user experience.

    Further information here:
    http://download.oracle.com/docs/cd/B10500_01/server.920/a96529/ch2.htm
    Here you will find a list of encodings and their description:
    http://download.oracle.com/docs/cd/B10500_01/server.920/a96529/appa.htm#967868

    Screencast
    The following screencast we’ve just uploaded to our YouTube channel shows how to set up an Oracle backend on a Linux Plastic server. Check it to see the steps I just have described in action.


  • Updated articles are maintained in the knowledge base of Codice Software at: http://www.plasticscm.com/infocenter/technical-articles.aspx

    Real Time Web Analytics