Who we are

We are the developers of Plastic SCM, a full version control stack (not a Git variant). We work on the strongest branching and merging you can find, and a core that doesn't cringe with huge binaries and repos. We also develop the GUIs, mergetools and everything needed to give you the full version control stack.

If you want to give it a try, download it from here.

We also code SemanticMerge, and the gmaster Git client.

Plastic SCM working with JIRA part II

Wednesday, July 30, 2008 mdepedro 3 Comments

Read the new version: "Parallel development with Plastic SCM and Jira".

Let´s see now how to use Plastic SCM and JIRA using the "task on changeset" working mode: the first steps for setting up the extension would be the same ones as explained on the previous post for the "task on branch" option, the only difference is on the "jiraextension.conf" file, in this case its configuration must be the following one:


<JiraExtensionConfiguration>
<HttpUrl>http://192.168.1.14:8080</HttpUrl>
<User>root</User>
<Password>root</Password>
<ProjectKey>PRJ</ProjectKey>
<BranchPrefix>SCM</BranchPrefix>
<WorkingMode>TaskOnChangeset</WorkingMode>
<CustomFieldId>customfield_10000</CustomFieldId>
</JiraExtensionConfiguration>


Once the extension is set we can start working with it!

You must take into account that even though on the previous case: "task on branch", only one task in Jira was linked to one Plastic branch; in this case you can link one or more tasks with one or more changesets.

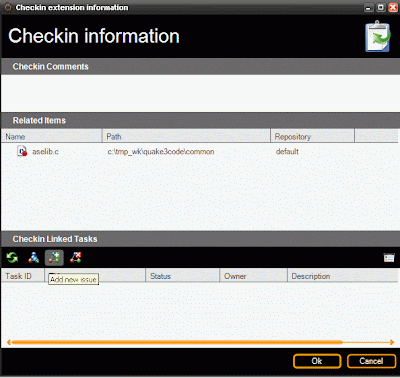
In order to start working, the project manager must have created issues in Jira and assigned them; as using this working mode, the pattern used would be “Mainline development” pattern or “Branch per developer", so in this case the user does not create a new branch for the task he is going to work on, but he checks out the files he wants to modify, makes his changes and check them in. At this point a check in information dialog will be displayed, as shown on the figure below, on this dialog the user will be able to write comments on the operation and on the "Checkin Linked Tasks" he can include the Jira issues to be linked with that changeset or commit operation:


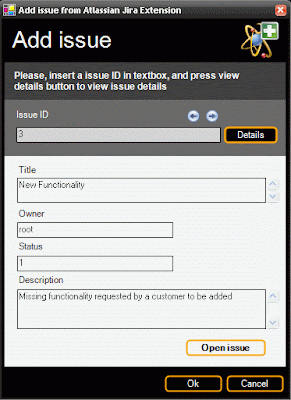
By clicking on the "Add new issue" option on the previous dialog a new one will be displayed to indicate the ID or number of the issue to be linked, several issues can be linked to one changeset and viceversa:


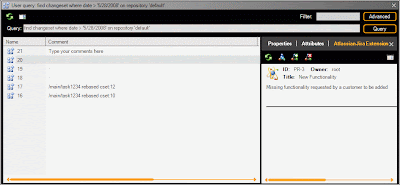
Once the changeset has been linked to the issue or task in Jira, we can go to the changesets´ view where the information of the extension is displayed just by selecting a changeset. From this view users can also add new issues or delete previous ones; and by clicking on each of them an Explorer window with the associated information in Jira.
3 comentarios:

Who we are

We are the developers of Plastic SCM, a full version control stack (not a Git variant). We work on the strongest branching and merging you can find, and a core that doesn't cringe with huge binaries and repos. We also develop the GUIs, mergetools and everything needed to give you the full version control stack.

If you want to give it a try, download it from here.

We also code SemanticMerge, and the gmaster Git client.

Plastic SCM working with JIRA Part I

Monday, July 28, 2008 mdepedro 0 Comments

Read the new version: "Parallel development with Plastic SCM and Jira".

On the series of posts about Plastic SCM extension I am going to explain how to use Plastic SCM and JIRA for the benefit of users of this task tracking system. Plastic SCM for Atlassian JIRA provides reliable data mapping features that allow data type transformation between both tools.

Jira extension allows you to log every check-in you do, associating them to a task. This feature improves the traceability in your software life cycle. To exploit this feature we have to perform several easy steps.

First of all, to enable this feature we have to setup a parameter on the Jira server, so you will need an Administrator account to create a new custom field. You can find this option on the "Administration" tab, then click on "Custom Fields".


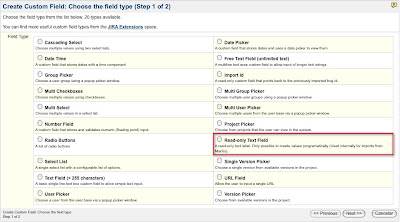
Then, you will see a new dialog. All you have to do to create a new custom field is to click on the "Add CustomField" button, and choose the ReadOnly text Field option


Now, you have to set a name to the new field. You can leave the options by default, which means that this check in log will be used for every project and every type of issue. Although these options can be modified later.


In the following step you have to associate the Plastic SCM field to a screen, this screen will be the default one.


The custom field will not appear until a check in operation is done by a client on a plastic branch binded to a Jira task

You can see that an internal id has been assigned to this CustomField
This number will be used later to setup a parameter on the Plastic Client.

Finally, go to "General Configuration" in Global Settings and check whether the ‘Accept remote API calls’ is active.


If not, click on "Edit Configuration" and enable it.


Ok, that was all on the server side.

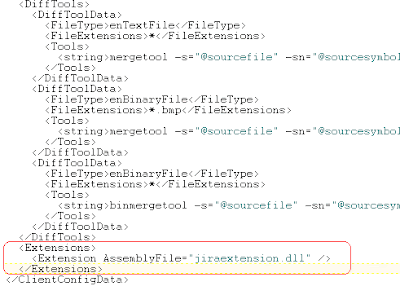
Now, in order to start working with Plastic,you have to copied the "jiraextension.dll" file on the Plastic SCM client folder, adding the following lines (circled in red, which will indicate that Jira is the extension used), on the client.conf file:


The next step to ensure that the extension is properly set up is creating a "jiraextension.conf" file; on this file we indicate the extension parameters. Here we have to options, the first one is the "Task on branch" option which is used to link one task in Jira with a branch in Plastic, in order to use this option the "jiraextension.conf" file must have the following appearance:

<JiraExtensionConfiguration>
<HttpUrl>http://192.168.1.14:8080</HttpUrl>
<User>root</User>
<Password>root</Password>
<ProjectKey>PRJ</ProjectKey>
<BranchPrefix>SCM</BranchPrefix>
<WorkingMode>TaskOnBranch</WorkingMode>
<CustomFieldId>customfield_10000</CustomFieldId>
</JiraExtensionConfiguration>

And now we are all set to start working!

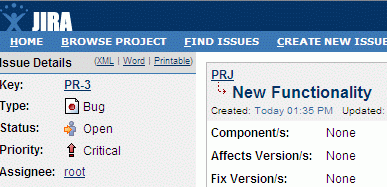
The person in charge of creating new tasks and assigning them has created a new Jira issue on the task tracking tool, which has been give number 3 on the project we are working on, as you can see on the following figure:


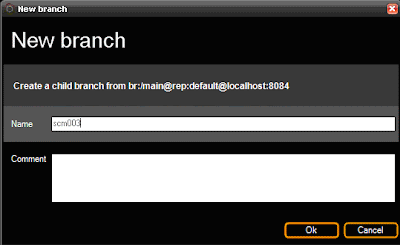
Once the task has been assigned (in this case to root as shown on the previous image), the developer will start working on it: he goes to Plastic and creates a new branch, giving it the same name as the Jira issue with the prefix stated on the "jiraextension.conf" file, in this case SCM:


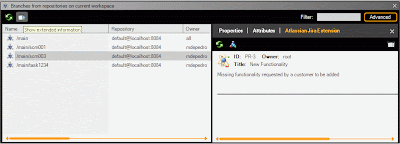
Now to see how the extension works, if we go to the branch view and click on the "Show extended information option" on the top and select the newly created branch we can see on a menu on the right the information of the issue linked to that branch displayed as shown on the following image:


The extension information shows the name of the Jira issue as well as its owner, title, comment and status. By clicking on it, an Explorer window with the associated branch issue is opened, whenever the user wants to change the status of the issue, he will only have to refresh it on the Plastic branch extended information and the new information will appear.

On the next post I will explain how to use the "task on changeset" working mode working with Plastic SCM and Jira!

0 comentarios:

Who we are

We are the developers of Plastic SCM, a full version control stack (not a Git variant). We work on the strongest branching and merging you can find, and a core that doesn't cringe with huge binaries and repos. We also develop the GUIs, mergetools and everything needed to give you the full version control stack.

If you want to give it a try, download it from here.

We also code SemanticMerge, and the gmaster Git client.

Mono repository on Plastic

Friday, July 25, 2008 Pablo Santos 1 Comments

We're working on a two way SVN synchronization with Plastic. It will enable dev groups using SVN to migrate to plastic little by little while they continue in synch with another locations which will take longer to move to plastic.

As a test, we're importing the Mono repository. Our intention is to create a public site to host open source projects with plastic, and of course, the first repository to be replicated will be the Mono code base.

Here you can find some screenshots of a preliminary import we were running today.

So, here is a view of the labels:


Branches:


A version tree of the mono directory:


The last imported changesets (please note we're not using the latest SVN repo)


The branch explorer...


And a branch content view:


So, it will take some time yet, but I expect to be publishing a Mono repos quite soon so you can take a look at the Plastic features browsing a big well-known repos.
Pablo Santos
I'm the CTO and Founder at Códice.
I've been leading Plastic SCM since 2005. My passion is helping teams work better through version control.
I had the opportunity to see teams from many different industries at work while I helped them improving their version control practices.
I really enjoy teaching (I've been a University professor for 6+ years) and sharing my experience in talks and articles.
And I love simple code. You can reach me at @psluaces.

1 comentarios:

Who we are

We are the developers of Plastic SCM, a full version control stack (not a Git variant). We work on the strongest branching and merging you can find, and a core that doesn't cringe with huge binaries and repos. We also develop the GUIs, mergetools and everything needed to give you the full version control stack.

If you want to give it a try, download it from here.

We also code SemanticMerge, and the gmaster Git client.

Plastic SCM and Mantis II

Friday, July 25, 2008 mdepedro 0 Comments

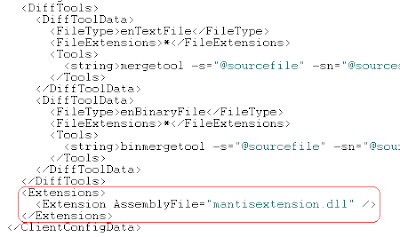
As seen on the previous post, Plastic SCM and Mantis I, in order to use this extension, the first thing you will have to do is copy the ‘mantisextension.dll’’ library to Plastic SCM client fo,lder, and add the Mantis extension lines on the client.conf.
And then, for the working mode we are explaining on this post: "task on changeset", the following "mantisextension.conf" file must be created:

<MantisExtensionConfiguration>

<MantisBaseUrl>http://localhost:8888</MantisBaseUrl>

<Branchprefix>SCM</Branchprefix>

<workingmode>TaskOnChangeset</workingmode>

</MantisExtensionConfiguration>


Now that the extension is set up you can start working with it!
Depending on your company´s structure, either the project manager or a developer would be in charge of creating Mantis tasks and then assign them to the developer who would work to solve them.
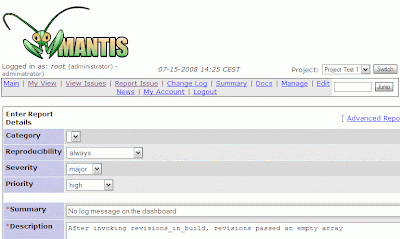
On this example we create two new tasks: task number 4 as shown on the image below, and also task 5.

Once the tasks have been created and assigned, the developer starts working, he makes his changes after checking out the items he is going to work on (either from Plastic GUI or from one of its IDE plug ins), and when the changes are done and he checkes his code in Plastic will open a window on which the user can include in the “checkin information”, it has the following appearance:

As you can see, on the top of this window the user can include his check in comments and the list of related items is shown.
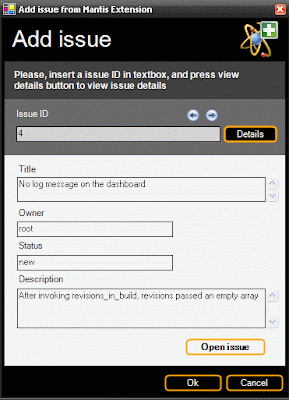
The checked in tasks are included at the buttom, by selecting the option "Add new issue" the following window will appear:

Just by entering the task number as we include number 4 for the newly created task, the information of the Mantis issue will be shown.
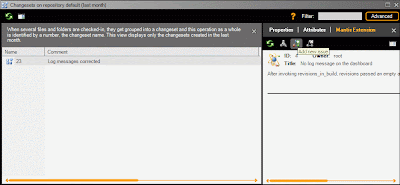
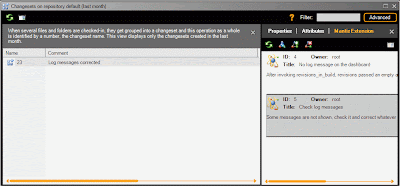
Once the check in operation is done we can go to the changeset view and just by clicking on the changeset view and selected a changeset, we can see the Mantis Extension information on the right, in this case, by selecting the created changeset, 23, we can see on the extension information about its associated task, number 4; but that is not all...as using the "task on changeset" mode, one or more than one tasks can be related with one or more changeset, from this view we can also add new tasks to the changeset.

Now we have associated two tasks with changeset 23 as both of them have been solved on the same check in operation, by clicking on one of the tasks shown on the extension information we can either delete it necessary, or open the task on the Mantis IDE, from which information such as the status of the task can be modified and it will be inmediately reflected on Plastic information of the extension as soon as it is refreshed!

0 comentarios:

Who we are

We are the developers of Plastic SCM, a full version control stack (not a Git variant). We work on the strongest branching and merging you can find, and a core that doesn't cringe with huge binaries and repos. We also develop the GUIs, mergetools and everything needed to give you the full version control stack.

If you want to give it a try, download it from here.

We also code SemanticMerge, and the gmaster Git client.

Plastic SCM and Mantis I

Thursday, July 24, 2008 mdepedro 0 Comments

On the series of posts about Plastic SCM extension with task tracking tool, let´s see how to use Mantis extension!

As on the case of other extensions, Plastic SCM extension with Mantis provides with two different working mode options: "task on branch" and "task on changeset", on this post I will talk about the first of them. To set up the extension in Plastic you must copy the ‘mantisextension.dll’’ library to the folder where you have installed Plastic SCM client and insert the following lines (circled in red) on the "client.conf" file:


You also need to create a "mantisextension.conf" file, which must have the following appearance:


<MantisExtensionConfiguration>
<MantisBaseUrl>http://localhost:8888</MantisBaseUrl>
<Branchprefix>SCM</Branchprefix>
<workingmode>TaskOnBranch</workingmode>
</MantisExtensionConfiguration>


Being MantisBaseUrl the Url on which Mantis is installed.

Branchprefix is the prefix will have the created branches on PlasticSCM that you want to associate with Mantis issue. As the working mode we want to use is "task on branch", we specify it.

Once the extension is set and Mantis issues have been created we can start working!
The first step on this working mode is creating a task in Plastic, which must have the same name as the Mantis issue we want to link it to (in this case as the prefix is SCM we have to for example create branch /scm004 to link it with issue 4). Please be aware that using the "task on branch" working mode one single Mantis issue corresponds with one single Plastic SCM branch.

After the branch has been created, if you want to see the extension information you only have to go to the branch view and click on the "Show extended information option" on the top, then select the newly created branch and a menu on the right with the extension information will be displayed as the following image shows:


The extension information shows:

  • the name of the Mantis issue,
  • its owner, description,
  • comment
  • and status.

    By clicking on it, an Explorer window with the associated branch issue will be opened, so that when the user wants to change the status of the issue or its description, he will only have to refresh it on the Plastic branch extended information and the new information will appear.
  • 0 comentarios:

    Who we are

    We are the developers of Plastic SCM, a full version control stack (not a Git variant). We work on the strongest branching and merging you can find, and a core that doesn't cringe with huge binaries and repos. We also develop the GUIs, mergetools and everything needed to give you the full version control stack.

    If you want to give it a try, download it from here.

    We also code SemanticMerge, and the gmaster Git client.

    How to use Plastic SCM and Bugzilla Part I

    Monday, July 21, 2008 mdepedro 2 Comments

    As you have probably already noticed, Plastic SCM gives you the option of using the task tracking system of your choice as it seamlessly integrates with a bunch of systems in the market …you can have a look at which ones here.
    On this post I will start explaining with actual examples, how to use Plastic SCM integrated with one of these systems: Bugzilla… First of all we have to Plastic SCM not only integrates with this system, but also offers customizable options for the integration. Why? Simple, for different working patterns we provide with different integrations: Let´s see the “Task on Branch” option first.
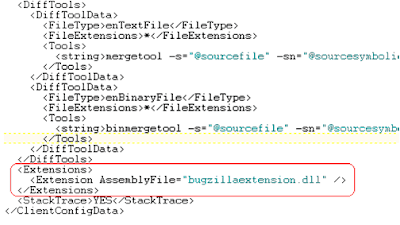
    In order to set up the Bugzilla extension on your client machine you have to copy “bugzillaextension.dll” on the folder where Plastic SCM client is installed and add the following lines (circled in red) in order to indicate the client to use this extension:


    And you would also need to create a file “bugzillaextension.conf”, its appearance by default is the following one:

    <bugzillaextensionconfiguration>

    <bugzillabaseurl>
    http://192.168.1.14:8888/bugzilla/3.0
    </bugzillabaseurl>

    <branchprefix>SCM</BRANCHPREFIX>


    Easy, uh?

    And by default the “Task on Branch” option is set, or you can specifically set it as follows:

    <bugzillaextensionconfiguration>

    <bugzillabaseurl>
    http://192.168.1.14:8888/bugzilla/3.0/
    </bugzillabaseurl>

    <branchprefix>SCM$lt;/branchprefix>

    <workingmode>TaskOnBranch</workingmode>

    </bugzillaextensionconfiguration>


    Now that the extension is set up:

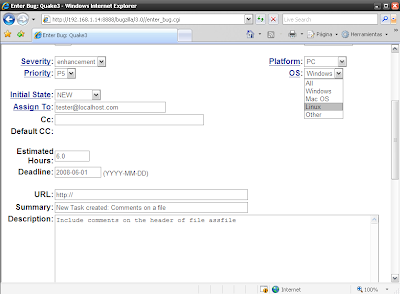
    The first step to start working with it would be creating a new bug on our task/bug tracking system: Bugzilla.


    As new bug created, it is on state “NEW” and assigned to “tester” in this case, we also include the number of hours estimated and the deadline for the task to be finished.
    The title given to this new task is New Task Created: Comments on a file, and a description is included.
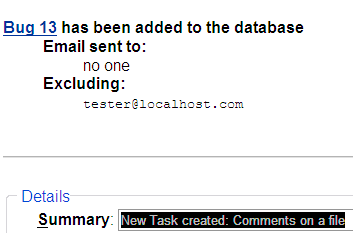
    By saving the bug we can see the ID given to this task by Bugzilla: 13 in this case, and we could indicate the system to send an email to the developer in order to let him know that we have assigned him a new task:


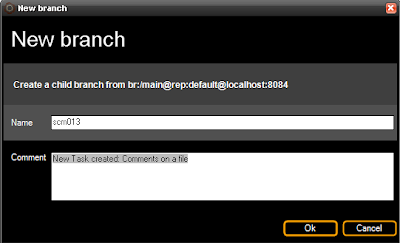
    When developer tester is ready to start working on bug 13, he will easily create a new branch and name it according to the bug created on Bugzilla, and add his comments accordingly:


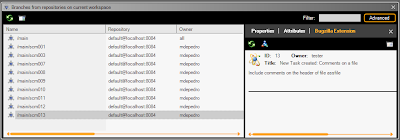
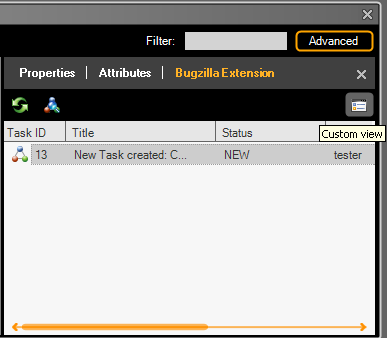
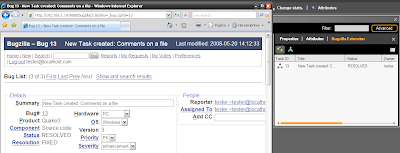
    Then going to the top left on the branch view we can display the extended information of branches, which will show information on the Bugzilla related bug when selecting a branch. On the following image we select the newly created branch /scm013 and on the right hand side we can immediately see the information of bug13: its ID, owner, title and comments are shown on the custom view:
    A standard view showing the current status is also available:

    And as soon as the task is accomplished we double clicking on the dialogue or just click on the extension button, which will take us to the bug on bugzilla, where we can change the status, which will be refreshed on Plastic:

    Simple and intuitive…I hope you like it!

    2 comentarios:

    Who we are

    We are the developers of Plastic SCM, a full version control stack (not a Git variant). We work on the strongest branching and merging you can find, and a core that doesn't cringe with huge binaries and repos. We also develop the GUIs, mergetools and everything needed to give you the full version control stack.

    If you want to give it a try, download it from here.

    We also code SemanticMerge, and the gmaster Git client.

    New Release: Plastic SCM 2.5 is out!

    Friday, July 18, 2008 mdepedro 0 Comments

    We are happy to anounce that we have just released Plastic SCM 2.5 which provides with a whole new world of possibilities for your configuration management needs!


    The new release includes:


    • The demanded trigger system, which allows the execution of user commands for tasks such as enforcing branch creation policies or creating formatting rules.
      “After” and “before” event triggers automatically initiate actions when the events occur. The system provides with both workspace triggers executed by the workspace server (create workspace, set selector, add items, check in and check out) and repository triggers which are executed by the repository server (create branch, attribute, marker and repository) on the server side, and update trigger on the client side.


    • Smart branches system: The new branch system included on Plastic SCM allows users to implement any working pattern, as they "remember" their starting point whenever a user switches to a branch he does not have to set its base...and even further...a branch properties can be changed but its history will be stored. You can visit our "smart branches slide" by clicking here.


    • Attributes system: It allows users to include additional information to any system object. This is a very powerful and highly customizable system, as developers can choose to add any attribute and any values to those attributes...and then perform queries using the attributes (as find integrated branches, being the value integrated and the attribute status; or find labels submitted to customers A and B, etc).


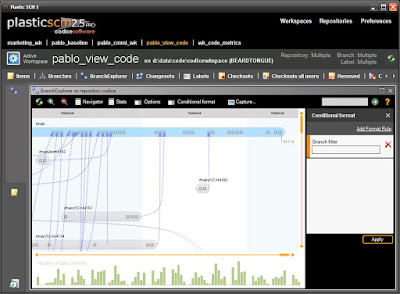
    • Plastic SCM extensions with task tracking tools (Jira, Mantis, DevTrack, OnTime, VersionOne and Bugzilla) have been improved: As you can see on the image below, we have included an extension button on the GUI where the task information is displayed. And furthermore!, the extensions now support two different working methods: Task on branch and Task on changeset!


    • Improved performance on several operations, such as add, check in and check out, when executed in blocks, which have now double their speed, resulting on an even faster system.


    • System enhancements on Eclipse integration, CVS importer and Plastic SCM installer.


    • A number of bug fixes.


    A great release as a result of a big effort on our development team!

    0 comentarios:

    Who we are

    We are the developers of Plastic SCM, a full version control stack (not a Git variant). We work on the strongest branching and merging you can find, and a core that doesn't cringe with huge binaries and repos. We also develop the GUIs, mergetools and everything needed to give you the full version control stack.

    If you want to give it a try, download it from here.

    We also code SemanticMerge, and the gmaster Git client.

    MD5 vs SHA1

    Saturday, July 05, 2008 Pablo Santos 8 Comments

    Plastic relies on hashes for certain operations related to file and directory contents.

    Hashes can take some time to be calculated so choosing the right one can be important.

    We're currently using MD5. Is it faster or slower than SHA1?

    Here's the code I used to recursively calculate the hashes of the files of an entire directory:


    class Hasher
    {
    static void Main(string[] args)
    {
    string path =
    args.Length > 0 ? args[0] :
    Environment.CurrentDirectory;
    string hashtype = args.Length > 1 ? args[1] : "md5";
    Hasher calculator = new Hasher();
    int ini = Environment.TickCount;
    calculator.Calculate(path, hashtype);
    Console.WriteLine(
    "Time hashing {0} files {1} ms. Method {2}",
    calculator.mCount,
    Environment.TickCount - ini,
    hashtype);
    }

    int mCount = 0;
    int mConvert = 0;

    void Calculate(string root, string hashtype)
    {
    string[] files = Directory.GetFiles(root, "*");

    foreach( string file in files )
    {
    Console.Write("Hashing {0}: ", file);
    FileStream st = new FileStream(
    file,
    System.IO.FileMode.Open,
    System.IO.FileAccess.Read,
    System.IO.FileShare.ReadWrite);
    string hash;
    if( hashtype == "sha1" )
    hash = CalcSHA1HashCode(st);
    else
    hash = CalcMD5HashCode(st);
    Console.WriteLine(hash);
    st.Close();
    ++mCount;
    }

    string[] directories =
    Directory.GetDirectories(root, "*");
    foreach( string directory in directories )
    Calculate(directory, hashtype);
    }

    string CalcMD5HashCode(FileStream file)
    {
    MD5CryptoServiceProvider md5Provider =
    new MD5CryptoServiceProvider();
    Byte[] hash = md5Provider.ComputeHash(file);
    return Convert.ToBase64String(hash);
    }

    string CalcSHA1HashCode(FileStream file)
    {
    SHA1CryptoServiceProvider sh1Provider =
    new SHA1CryptoServiceProvider();
    Byte[] hash = sh1Provider.ComputeHash(file);
    return Convert.ToBase64String(hash);
    }
    }


    And the results:
    Time hashing 1379 files 3676 ms. Method sha1
    Time hashing 1379 files 3515 ms. Method md5

    So almost no difference between the two methods. Mono and .NET obtain the same results too.

    What can really be a difference (obviously) is the filesystem status: the first time you try it on a directory it will be much (about 10 times) slower! And here Linux systems normally win the battle due to their cache management strategies.
    Pablo Santos
    I'm the CTO and Founder at Códice.
    I've been leading Plastic SCM since 2005. My passion is helping teams work better through version control.
    I had the opportunity to see teams from many different industries at work while I helped them improving their version control practices.
    I really enjoy teaching (I've been a University professor for 6+ years) and sharing my experience in talks and articles.
    And I love simple code. You can reach me at @psluaces.

    8 comentarios:

    Who we are

    We are the developers of Plastic SCM, a full version control stack (not a Git variant). We work on the strongest branching and merging you can find, and a core that doesn't cringe with huge binaries and repos. We also develop the GUIs, mergetools and everything needed to give you the full version control stack.

    If you want to give it a try, download it from here.

    We also code SemanticMerge, and the gmaster Git client.

    Distributed software development explained

    Saturday, July 05, 2008 Pablo Santos 0 Comments

    We've just published a new article on DDJ, this time talking about distributed software development.

    You can find the whole text online here: http://www.ddj.com/architect/208802468.

    It covers several scenarios: from basic multi-site to full distributed, and it explains in detail how conflicts are solved when items are modified concurrently at different locations.

    Hope you like it!
    Pablo Santos
    I'm the CTO and Founder at Códice.
    I've been leading Plastic SCM since 2005. My passion is helping teams work better through version control.
    I had the opportunity to see teams from many different industries at work while I helped them improving their version control practices.
    I really enjoy teaching (I've been a University professor for 6+ years) and sharing my experience in talks and articles.
    And I love simple code. You can reach me at @psluaces.

    0 comentarios: