Who we are

We are the developers of Plastic SCM, a full version control stack (not a Git variant). We work on the strongest branching and merging you can find, and a core that doesn't cringe with huge binaries and repos. We also develop the GUIs, mergetools and everything needed to give you the full version control stack.

If you want to give it a try, download it from here.

We also code SemanticMerge, and the gmaster Git client.

User pain

Monday, June 23, 2008 Dave 1 Comments

After reading Jonathan's interesting post about bug classification, I got interested in the article behind it, finding a very promising approach. It has been an issue for us during the last months and this approach looked good to the team.

After making a few samples with some variations on the formula, we decided to give it a try, so I implemented a few changes during the weekend to support it on our internal defect tracking tool (it's a bit primitive, but easy to customize), here you can see the result:


I think the method will need to be fine-tuned for our needs, but we already see an improvement over just having a very subjective "priority" field for the bug.

Thanks Jonathan for the excelent reference!

By the way, the original article can be found here. It's worth reading!

1 comentarios:

Who we are

We are the developers of Plastic SCM, a full version control stack (not a Git variant). We work on the strongest branching and merging you can find, and a core that doesn't cringe with huge binaries and repos. We also develop the GUIs, mergetools and everything needed to give you the full version control stack.

If you want to give it a try, download it from here.

We also code SemanticMerge, and the gmaster Git client.

Two new articles

Monday, June 16, 2008 Pablo Santos 0 Comments

We've published two new articles. The first one on DDJ Code talk, about Distributed Software Development, and you can find it here:

http://dobbscodetalk.com/index.php?option=com_myblog&task=view&id=526&Itemid=85

And a second one introducing ways to automate Plastic actions from the command line:

http://www.plasticscm.com/support/cli.aspx

Enjoy!
Pablo Santos
I'm the CTO and Founder at Códice.
I've been leading Plastic SCM since 2005. My passion is helping teams work better through version control.
I had the opportunity to see teams from many different industries at work while I helped them improving their version control practices.
I really enjoy teaching (I've been a University professor for 6+ years) and sharing my experience in talks and articles.
And I love simple code. You can reach me at @psluaces.

0 comentarios:

Who we are

We are the developers of Plastic SCM, a full version control stack (not a Git variant). We work on the strongest branching and merging you can find, and a core that doesn't cringe with huge binaries and repos. We also develop the GUIs, mergetools and everything needed to give you the full version control stack.

If you want to give it a try, download it from here.

We also code SemanticMerge, and the gmaster Git client.

Branching and merging with Delphi, Part II

Friday, June 06, 2008 Pablo Santos , 0 Comments

In the first part we talked about the very basics of using Plastic SCM with Delphi. Now let's focus on how to do branching and merging and how Plastic deals with the Delphi source code.

Creating branches

My preferred branching pattern using Plastic SCM is branch per task so that’s exactly what I’ll do now: I’ll create a couple of branches and then work in parallel, modifying the same code differently as two developers would do. I won’t care about where I make the changes and I’ll let Plastic reconcile the changes once I’m done. Hey, that’s why branching and merging is there, right?

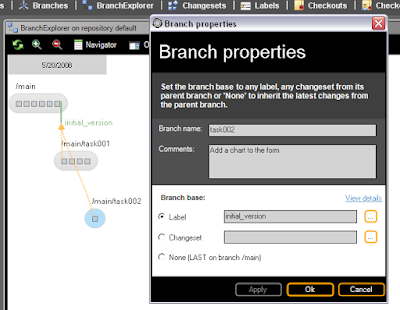
What does it take to create a new branch in Plastic? Easy: it has nothing to do with arcane copy commands or strange instructions (well, you can type cm mkbr if you’re a command-line-aholic, of course), just go to the branch explorer, right click the branch that you want to branch off and select create child branch. Then the smart branch creation dialog will pop up:


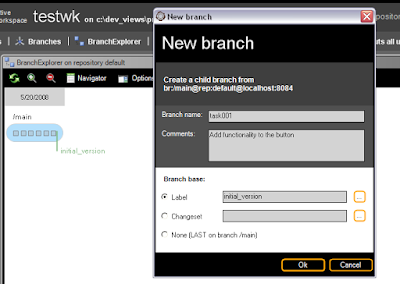
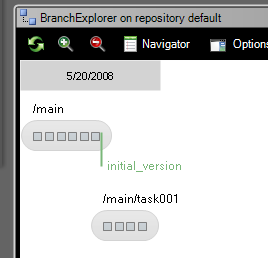
What’s a smart branch? Well, it is just a branch which is able to remember where it is starting from at a certain point in time. To put it simple, you tell your branch where are the sources you want to modify, and you can modify this location later on. In my sample I told Plastic to create a branch named task001 starting from the label I created above: initial_version.

Note: no, you don’t need to write underscores instead of spaces in label names, you could have typed initial version and it would be a valid label name but, you know, having used old good DOS for years you never really trust it is going to work... ;-)

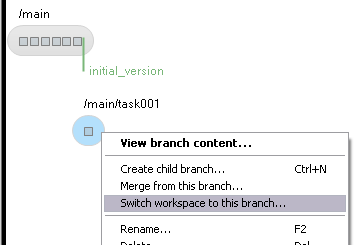
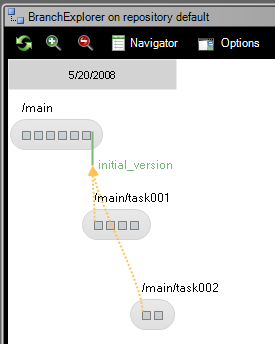
After your new branch has been created you can take a look at your branch explorer as you see on the figure below, and then use it to switch to it and start working on the branch.


You can also examine the branch properties and check a small scheme showing how the branch is currently configured.


Working on the first task

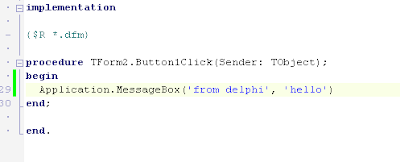
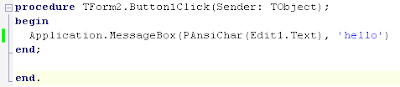
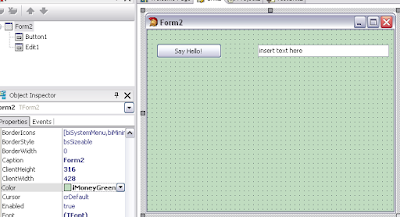
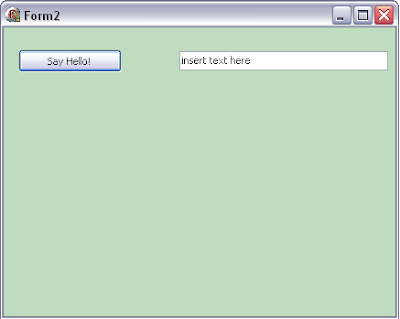
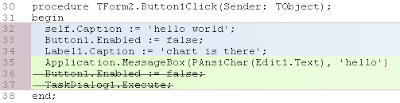
Let’s now focus on the first work assignment we have: modifying the form so that it has a better layout, a wider edit box and a green background. We’ll also modify the code associated to the OnClick button event to run a different action as the figure below shows.


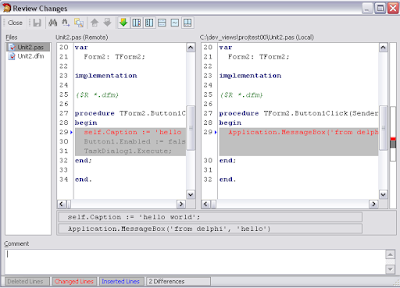
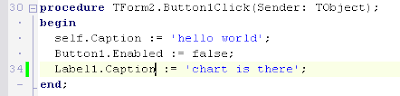
Now I’ll run another useful tool from the Source Control menu: review changes. Running this option I get the following results which show how I have modified the Button1Click code.


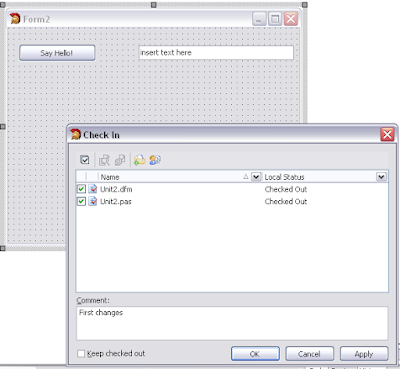
So now I’m ready to checkin my first changes: I’ve modified both the .dfm and the .pas files.


I’ve just realized I don’t like the change I’ve just made in the code (I think it is not even working), so I modify again the .pas file and type the following code:


The good thing using a branch for each task is that you don’t have to worry about how many commits (or checkins) you make: just check in whenever you feel it is ok to save a copy, the code won’t go to your project’s mainline, so you aren’t affecting anyone even if your intermediate changes don’t compile, and you can still use the version control as your own versioning mechanism.

Finally I’ll be changing the form’s background to make it uglier with a money green color.


What has changed in the .dfm file? The good thing about .dfm (at least since version 2 if I remember correctly, when they were converted from a binary to a text format) is that the entire user interface is defined in a text format (yes, now we’re all used to it, but Delphi was able to do it... ten years ago!), so you can easily run diffs and merges on them.


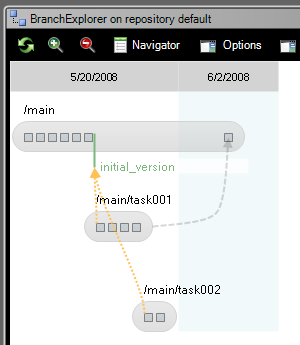
How does my branch explorer look like after working on the same branch?


Placing a chart on the form

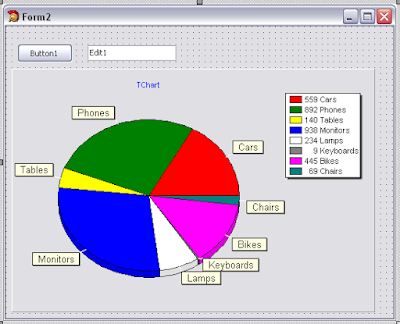
Ok, consider the following: before I’m done with the first programming task a second developer starts working on the application too. He has to introduce a chart in the form.

He will start working from the last known good version of our test application, which was intial_version. His branch explorer will look like this:


Please note I’ve activated the parent links for this screenshot, that’s the reason why you’re now seeing the yellow lines pointing from a branch to its starting point.

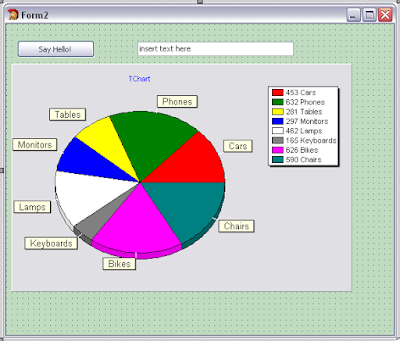
The developer adds a chart to the form which looks like this:


Please note that I’m not seeing the green background nor the other changes made by the other developer on task001 because I’m starting from the last known good baseline. Is that ok?

Well, I can hear some of you saying: “hey, but then you’ll have to reorganize the entire dfm manually after making your changes in parallel”. Believe me, you won’t!

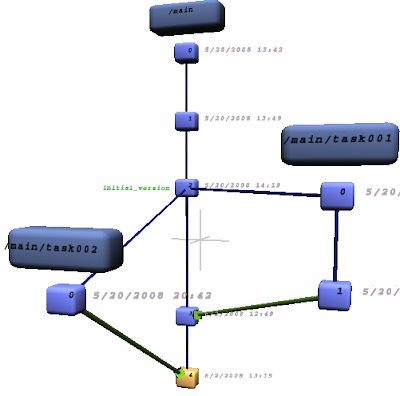
I’ll show now a 3D version tree of the dfm file containing the GUI definition:


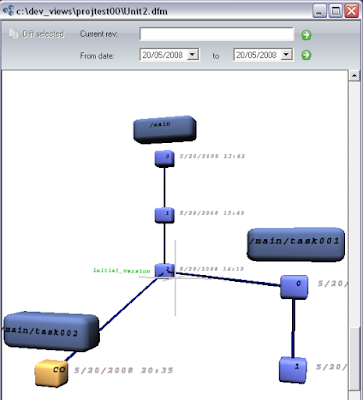
Yes, you clearly see that developer on task001 made two changes on the form, and the one on task002 only one... in parallel!

And to make things a bit more complicated I’ll also modify the OnClick event for the button writing the following code:


Merging changes back

It’s time to merge your changes back to the mainline. Right now your development looks like:


Now you just go to the branch explorer, right click the main branch and click on switch to branch.

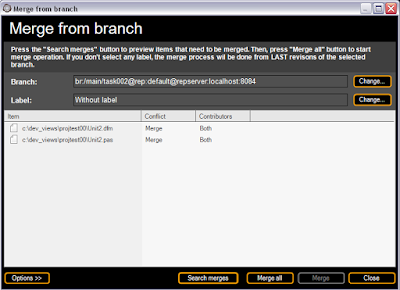
Then select task001, right click on it and choose merge from this branch, and Plastic will display the merge dialog:


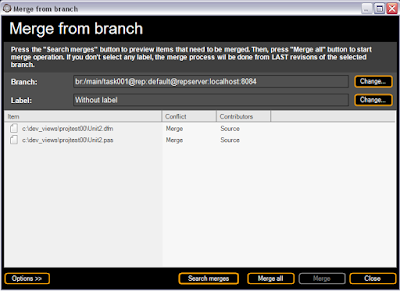
These are the two files you’ve modified on branch task001. There won’t be any conflict as it is the first branch we’re merging back and Unit2.dfm nor Unit2.pas have been modified on main in the meantime. In the contributors column you see the two of them are saying Source as contributor, which means there’ve been changes only in the task001 and not on main.

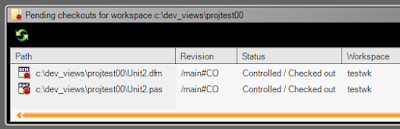
We run merge all and the merge is performed by Plastic.

After the merge is done the affected files are kept in checked out status so you can easily check them, compile your code and verify that everything went correctly.


You can also check the version tree of our Unit2.pas file:


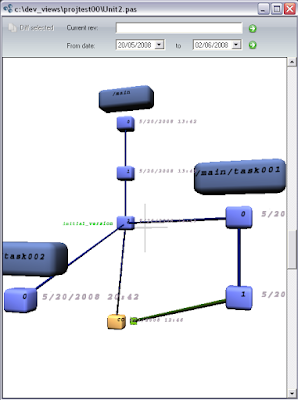
It shows a new green arrow meaning a merge has been performed.

This is how merge traceability is stored.

I build the application and this is how it looks like after the task001 is integrated (ok, so far only task001 is on the main branch):


And here you can see how the branch explorer looks like after the first merge is finished and the files are checked in:


Merging task002

Merging task001 was pretty simple: the changes made on the branch were just copied into main, no real merge was done between the revisions.

But now things are different with task002 because it actually modified the same files as task001.

If you run the merge dialog right clicking on task002 branch and selecting merge from this branch you’ll see the following:


What’s different now?

Well, notice that the contributors column now says the files have been changed both in main (after merging task001) and task002.

We run the merge and we check how the dfm file is merged automatically, which is actually very good news.

The .pas file needs some help to be merged: if you remember we modified exactly the same method twice on two different ways, so Plastic doesn’t exactly know how it should solve the conflict.

The three way merge tool shows up:
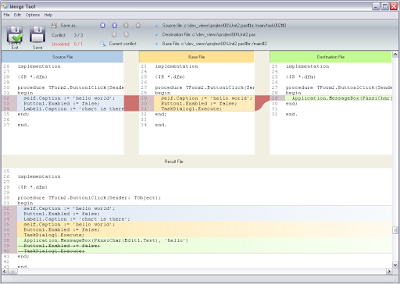


What’s in there?

The source pane shows the file you’re merging from task002, the source then. The base pane shows your Unit2.pas as it was before changes were done: as it was on initial_version. And finally the pane on the right, the destination file shows the Unit2.pas as it is now on your workspace after task001 was integrated.

The pane on the bottom is the results and is proposing you to group the three blocks together, which is something you’ll need to modify.

Please note the three way merge tool is detecting 3 conflicts, but it was able to solve 2 of them automatically because they weren’t affecting the same code blocks.
I decide to stay with changes on the two tasks but get rid of the base:


Everything merged

How does my form look like after the merge? Well, as expected it has the background color of task001, the button and edit box modified there and the chart introduced in task002 as you can see below:


The great thing here is that both developers were able to focus just on the changes they had to perform, and didn’t have to worry about each other until the modifications were finished, and then Plastic took care of merging them together.

The version tree of the Unit2.pas file now looks like:


Conclusion

In my humble opinion Delphi is still one of the most powerful development environments out there, and of course it benefits from all the advantages of proper branching and merging. Plastic can be integrated with Delphi with the help of SourceConneXion and it really seems they make a great team working together!

Of course as a long time Delphi developer (I’ve even worked with Kylix for a while!) it is always a pleasure to take a look into how the folks behind the Delphi’s dev team handle the evolution of their tool.
Pablo Santos
I'm the CTO and Founder at Códice.
I've been leading Plastic SCM since 2005. My passion is helping teams work better through version control.
I had the opportunity to see teams from many different industries at work while I helped them improving their version control practices.
I really enjoy teaching (I've been a University professor for 6+ years) and sharing my experience in talks and articles.
And I love simple code. You can reach me at @psluaces.

0 comentarios:

Who we are

We are the developers of Plastic SCM, a full version control stack (not a Git variant). We work on the strongest branching and merging you can find, and a core that doesn't cringe with huge binaries and repos. We also develop the GUIs, mergetools and everything needed to give you the full version control stack.

If you want to give it a try, download it from here.

We also code SemanticMerge, and the gmaster Git client.

Branching and merging with Delphi, part I

Monday, June 02, 2008 Pablo Santos , 0 Comments

I spent years programming in Delphi, from the first version 1.0, more than ten years ago, to the excellent releases 6 and 7. I also grew up as a developer using tools like TurboPascal so when a couple of days ago I had the chance to have a try on the latest Delphi IDE and check how it works with Plastic it was actually a very rewarding experience.

Installing Plastic plugin

When you install Plastic to be integrated with Delphi, remember to check the Visual Studio integration option in the installer. Plastic currently integrates with Delphi using the SCC API so if you don’t install the SCC plugin you won’t be able to make it run within Delphi.

Once Plastic is installed you’ll need to download and install SourceConneXion. You can obtain it from http://www.epocalipse.com/downloads.htm. I’ve tried version 3 and it works great. Remember to download SourceConneXion and not VssConnection (as I did the first time) because the latter only works with Visual Source Safe.

Open Delphi, and go to Source Control\Tools\Provider Configuration and select Plastic as your version control provider.


Now you have Plastic installed and working.
You can take a look at the Delphi configuration options for plugins (Source Control\Tools\Options) in order to set up whether you want automatic checkouts, and so on.

Adding a project under source control

I started with a very simple Win32 project containing just a form and a button as you can see on the following figure:


Then I just right clicked on my project and selected the add to source control option.


If you still don’t have a workspace at your project’s location Plastic will help you creating one. You need to place your Delphi projects inside a Plastic workspace. For normal (and complex) Delphi projects a Plastic workspace will be used to work on different ones. A workspace is just a place on your disk where you work with your projects and Plastic knows that it has to control all changes there.
Delphi creates a list of the files to be added and shows it in a dialog so you can decide which ones go in or are rejected. In my case I typed a short comment telling this was the initial code import.


Start working

Once your project is under source control you can start working. Another developer can already create a new workspace on his machine and download the code you’ve just added.

I played a little bit with the Delphi functionalities and created a DUnit testing project. I also placed it under source control. Then I decided to change on the sample test methods so I just typed a key on the file. The file was checked in so Delphi prompts you if you want to check out the file before making any further modifications.


From now on the process will be very simple: checkouts will happen automatically whenever you start typing on a protected file. To checkin your changes you just have to go to the Source Control menu or right click on your file on the Project Manager pane.

Project explorer

Under the Source Control menu there’s an interesting option: the project explorer. You can take a look at your entire project tree (very simple in my case) and check whether the files are checkout or not.


The project explorer is also very useful to select several files and run group checkins from there.

Changing a file’s type

Plastic recognizes Pascal’s file extensions but it can happen that you use a different Delphi version or that you have under version control a file which type has been wrongly identified by Plastic. I mean, maybe you have a binary file which should be identified as text or vice versa. It is important for running diffs and merges because text and binary tools are different.

If you need to modify a file type, simply go to the Plastic GUI (you can also do it from the command line, but the GUI is easier) select the file you want to change, right click on it and go to the type menu option.


You can also do it from the file history.

Labelling your source code

So far I’ve just made some modifications on the main branch so my branch explorer looks like the following figure (please note to display the branch explorer you've to go to the Plastic GUI). There are just some changesets available but no branches at all.


The first thing I’ll do is creating a baseline with the code I’ve made so far, so I have a good starting point to use during development. I mean, I have a version of my entire project which I know it works, it compiles, it passes the tests, and so on (yes, here I have just a very simple project, but you know, I describe how things should be).

To do so I go to the labels view and choose to create new label and then I type the name and comments of the new label.


Please remember in Plastic labelling is a two-step process: first you create the new label and then you apply it to your workspace. So here is the second step.


How does my branch explorer look like after the labelling? Just take a look at the following figure.


Wrapping up

So far we've seen the very basics of starting a project with Delphi and Plastic SCM. Now we know how to add a project under source control, perform basic operations, label a release...

In the next post I'll be introducing branching and merging using a Delphi project...
Pablo Santos
I'm the CTO and Founder at Códice.
I've been leading Plastic SCM since 2005. My passion is helping teams work better through version control.
I had the opportunity to see teams from many different industries at work while I helped them improving their version control practices.
I really enjoy teaching (I've been a University professor for 6+ years) and sharing my experience in talks and articles.
And I love simple code. You can reach me at @psluaces.

0 comentarios: